When it comes to knitting, mistakes are part of the learning curve. They’re like those speed bumps that slow you down but ultimately make you a more cautious and skillful driver. So don’t sweat it if you mess up; you’re not alone, and more importantly, you’re not doomed.
Mistakes can range from minor hiccups, like dropped stitches, to major issues, like incorrect gauge messing with your entire project. Each type of mistake has its own way of wrecking your work, but with the right techniques, you can minimize and even fix these errors before they ruin your masterpiece.
Early detection is your best friend. Spotting mistakes early can save you hours of backtracking and re-knitting. By simply reviewing your work regularly, you prevent those tiny issues from snowballing into massive, frustrating problems.
Knowing the potential impact of common errors can really change the game. For instance, something as small as a twisted stitch can throw off an intricate pattern, while uneven tension can make your fabric look like it had a bad hair day. Awareness is the first step to prevention, and trust me, a little knowledge goes a long way.
The final and perhaps most crucial takeaway is this: don’t let mistakes discourage you. Everyone, from beginners to seasoned knitters, makes them. Each mistake is an opportunity to learn and improve. So get comfortable and embrace the process—bumps and all.
Dropped Stitches: How to Spot and Fix Them
Dropped stitches are like that elusive sock that always escapes from the laundry. One moment it’s there, snug on your needle, and the next it’s causing an unraveled mess. If left unchecked, a dropped stitch can turn your project into a patchwork of frustration.
A dropped stitch happens when a loop fails to get pulled through and unravels down the row. It leaves a rogue ladder in your knitting that’s as welcome as a pothole on a smooth road. Spotting these can be tricky at first, but once you know what to look for, it’s like finding Waldo in a crowd. Focus on areas where the stitching looks looser or the yarn appears out of place. A close, regular check-up on your work helps catch these renegades early.
Fixing a dropped stitch isn’t rocket science, but it requires a bit of finesse. For a small number of stitches, grab a crochet hook—your trusty sidekick. Insert the hook through the dropped stitch from below and carefully pull it back up to the correct row, stitch by stitch. It’s like rescuing a friend from quicksand; slow and steady wins the race.
Check out this tutorial for how to fix drop stitches.
However, if things look more like a chaotic spill than a minor blip, you might need a lifeline. This involves threading a contrasting piece of yarn through your stitches in the correct row, providing a safety net while you fix the dropped ones. It’s a bit like putting on a safety harness before tackling a tricky climb.
Preventing dropped stitches in the first place is the goal. Keep an eye on your work rhythm and ensure your stitches are securely on the needles. Tension, awareness, and a regular check-up routine can help keep your knitting smooth and mistake-free.
Maintaining Correct Gauge
Gauge might sound like knitting jargon, but it’s essentially about getting the correct size and fit for your project. If your gauge is out of whack, whether too tight or too loose, you could end up with a sweater fit for a toddler or a giant.
Gauge is measured by knitting a swatch, a small sample of your stitch pattern. Once you’ve knit your swatch, measure the number of stitches per inch both vertically and horizontally. This tells you if you’re on track with the pattern’s recommended gauge.
If your swatch has too many stitches per inch, it means your gauge is too tight, and you need to go up a needle size. Conversely, if there are too few stitches per inch, your gauge is too loose, and you need smaller needles. Sometimes, the solution involves playing with different needle materials – like switching from metal to wood – because different materials interact differently with yarn.
The importance of gauge goes beyond just achieving the correct size. Incorrect gauge can also affect the drape and texture of your project, potentially transforming soft, flowing fabric into something stiff and bulky.
Check out this article for more information on gauge.
Making a swatch may seem like an extra step, but it can save you from serious heartache down the line. Most patterns include a gauge recommendation for a good reason, and ignoring it is like trying to bake a cake without checking the recipe’s ingredient proportions. Invest the small amount of time it takes to knit and measure a swatch; it’s worth it.
Preventing and Fixing Twisted Stitches

Photo credit: Nourish & Nestle
Twisted stitches can be the sneaky saboteurs of your project. They happen when you inadvertently knit through the back loop instead of the front, or when your stitches get turned the wrong way on the needle. The result can be uneven, pinched-looking stitches that stand out for all the wrong reasons.
Spotting twisted stitches can be subtle at first. Look for stitches that appear tighter or more compact than the others. They might also look like they’ve had their morning coffee without their morning muffin—tense and cranky. Regularly scanning your work can help catch these mishaps early.
To fix a twisted stitch, you’ll need to untwist it carefully. Insert your needle through the twisted stitch, then pull it off and re-orient it correctly on the needle. Knit it again, this time through the front loop. Think of it as giving your stitch a little chiropractic adjustment—it can make a world of difference.
Preventing twisted stitches is all about awareness and technique. Pay close attention to your needle movements and ensure you’re knitting through the correct loop. This is especially important when picking up stitches from previous rows or during complex maneuvers like cable knitting. Taking your time with each stitch will save you time and frustration later.
If you find twisting happening frequently, experiment with different knitting styles or needle types to see if they help you stay oriented. Practice makes perfect, and mastering your stitch technique will lead to smoother, more professional-looking projects.
Achieving Consistent Tension

Photo credit: Nourish & Nestle
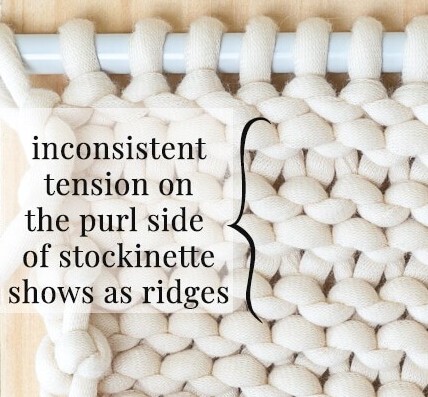
Consistency is the secret sauce to making your knitting projects look polished and professional. Uneven tension results in lumpy, uneven fabric that’s about as appealing as a wrinkled shirt at a fancy dinner.
Tension refers to how tight or loose you hold your yarn as you knit. If it’s too tight, your stitches will be small and stiff. If it’s too loose, you’ll get big, floppy loops that look more like spaghetti than a neat row of stitches.
Creating consistent tension is a skill that comes with practice and mindfulness. Start by monitoring how you hold your yarn. The key is to find a grip that feels natural but provides even resistance. Some knitters find success wrapping the yarn around their fingers, while others prefer weaving it through their fingers in a more relaxed manner.
Experimenting with different techniques can help determine what works best for you. Try knitting a few practice rows using various tensioning methods, noting which produces the best results. If you’re still struggling, swapping out needle sizes can sometimes help. Larger needles can make your stitches looser, while smaller ones can tighten things up.
Consistency over the course of an entire project is crucial. Regularly checking your tension ensures it remains even throughout. If you notice changes in your fabric’s tightness or looseness, take a moment to adjust and readjust your grip or tensioning method.
Finally, it’s all about patience and persistence. Think of tension control as a habit to develop, much like learning to ride a bike. The more you work on maintaining even tension, the more natural it will become. Your projects will thank you with smooth, consistent fabric that looks as good as it feels.
Tracking Increases and Decreases Accurately
Increases and decreases are like the architectural elements of knitting, shaping the fabric to fit your vision. But miss one, and it can feel like you’ve missed a turn on a long road trip.
Skipping an increase or a decrease throws off the stitch count and messes with the pattern’s flow. The project might not fit right, and your beautifully planned design can end up looking lopsided. Regularly counting your stitches and comparing them to the pattern helps detect these mistakes early.
Using stitch markers is a smart way to keep track of where these changes should occur. Place them at the beginning of each section where an increase or decrease is needed. This way, you have a visual cue that reminds you to make the necessary adjustment.
Sometimes, despite all precautions, an increase or decrease gets missed. If you’re keen on accuracy (and a bit of a perfectionist like me), frogging—a term for unraveling—might be the answer. Rib back to the point before the error and re-knit. However, if you miss fewer stitches or the pattern is forgiving, you might sneak in an increase or decrease on the next row and hope it blends in.
Properly reading your pattern is also a game-changer. Before you start, go through the entire pattern to understand where increases and decreases occur. Highlight or make notes of these points for quick reference as you knit.
Ultimately, attention to detail and a bit of patience go a long way. Perfecting this skill not only ensures your project looks polished but also builds your confidence as a knitter. So grab those stitch markers, keep a close watch on your stitch count, and knit on confidently.
Best Practices for Yarn Substitution
Yarn substitution can be like swapping ingredients in a recipe. Sometimes it works out great, and other times it throws off the entire dish. Using the wrong yarn can mess with the fit and feel of your project, turning what should be a cozy sweater into something better suited as modern art.
Matching the gauge is crucial. The new yarn needs to knit up to the same number of stitches per inch as your pattern calls for, or your piece may end up too big or too small. Always knit a swatch with the substituted yarn to ensure it behaves similarly to the recommended one.
Pay attention to fiber content and texture. Switching from a wool yarn to a cotton one, for example, can dramatically change the drape and elasticity of your project. Wool offers warmth and stretch, while cotton tends to be cooler and less flexible.

Color and finish also matter. Even if your substitute yarn matches the gauge perfectly, a shiny silk could give a very different look compared to a matte wool. Consider how the new yarn’s appearance will complement or contrast with your pattern.
Some patterns are more versatile when it comes to yarn substitution. If your pattern is textured or has an intricate stitch, choosing a yarn that highlights these features while maintaining structure is essential. Yarn with a too-busy colorway might obscure the stitch details.
Sticking close to the original yarn’s weight category is a good rule of thumb, but remember that even within the same category, yarns can vary in thickness. Check the yardage recommended for your project and compare it with the yardage of your substitute yarn.
Finally, embrace the process of experimentation. Sometimes the best results come from trial and error. Document your substitutions and the results to build knowledge for future projects. The right yarn can make your knitting sing, fitting your project like a glove and looking fantastic.
Vigilance in Following the Pattern
Following the pattern to the letter might sound like knitting on rails, but it’s key to ensuring your project turns out as expected. Misreading or skipping instructions isn’t just a rookie mistake; even seasoned knitters can fall into this trap.
Reading the entire pattern before starting is a best practice. This gives you a bird’s-eye view of the project and highlights any techniques or steps that are new or tricky. Making notes or highlighting sections can help you navigate the pattern more effectively.
Keeping track of your progress can prevent mistakes. Tools like row counters and stitch markers come in handy. A row counter helps track the number of rows you’ve completed, which is especially useful for patterns with intricate designs or frequent changes. Stitch markers can mark special rows or sections where you start a new pattern or piece.
Sometimes it’s helpful to create a checklist or a grid to mark off your progress. This extra layer of organization ensures you don’t miss any steps and makes it easier to pick up where you left off if you put your project down for a while.
Pay attention to abbreviations and terms used in the pattern. Each designer might use slightly different terminology or shorthand, and understanding these can make a big difference. A glossary or quick reference guide can be useful if you encounter unfamiliar terms.
Maintaining focus and pacing yourself is crucial. Rushing through the pattern increases the chance of mistakes. Take your time to read and understand each step before diving in. A clear mind leads to clear knitting, reducing errors and frustration.
Trust the pattern but also trust your instincts. If something doesn’t seem right, pause and reassess. Double-checking at each step ensures you’re on track and helps catch any misinterpretations early on.
Regular Error Checking: A Key to Success
Knitting isn’t just about completing rows—it’s also about creating something beautiful and functional without too many hitches along the way. Regular error checking is one of the smartest habits you can develop as a knitter. Spotting and correcting mistakes early ensures that minor snags don’t turn into major obstacles.
Set a routine for periodic checks as you progress. For example, every few rows, take a moment to spread out your work and look it over carefully. Check for things like dropped stitches, twisted stitches, and any changes in tension. This small investment of time can save you hours down the road.
Using lifelines in complex patterns acts as a safety net. Thread a contrasting piece of yarn through your stitches at regular intervals. This allows you to rip back to a known good point if you find errors. It’s like creating save points in a game, so you don’t lose all your progress if something goes wrong.
Make use of good lighting and a calm environment. Errors are easier to spot under bright light, and a relaxed setting helps maintain focus. Trying to knit while distracted or tired increases the chance of mistakes slipping through.
Regular checking also means being proactive with fixes. Don’t wait until the end of your project to address issues. Smaller corrections along the way are much easier to manage than a massive overhaul at the end.
Building in these regular checks not only improves the quality of your work but also boosts your confidence. Catching and fixing mistakes on the fly shows growth and mastery over your craft. Incorporate these habits, and you’ll find your knitting becomes more enjoyable and less fraught with worry.

